My first build journey started with the sewing circuit. Learning circuits is critical to me as I would like to understand and explore the possibility of technologies that we build and decision choices in designing them in the future. I have no experience in building circuits and I have no idea how they work. On the orientation week (A-Week), we’re asked to sew and wired up a circuit and make the colourful LED lights turn on. It was my first time working with circuits, so it’s fascinating for me. I’ve done some basics sewing before to fix my children’s clothes or knit a scarf, but never sew a thread for LED lights. So from the first week, I know that I will face many challenges throughout this journey, which excites me. My learning goal for circuits is I want to be able to understand how to assemble circuits and create working electronic devices that integrate with other techniques such as mechanical for the robot for my Maker Project and all future projects that I want to make for my kids.
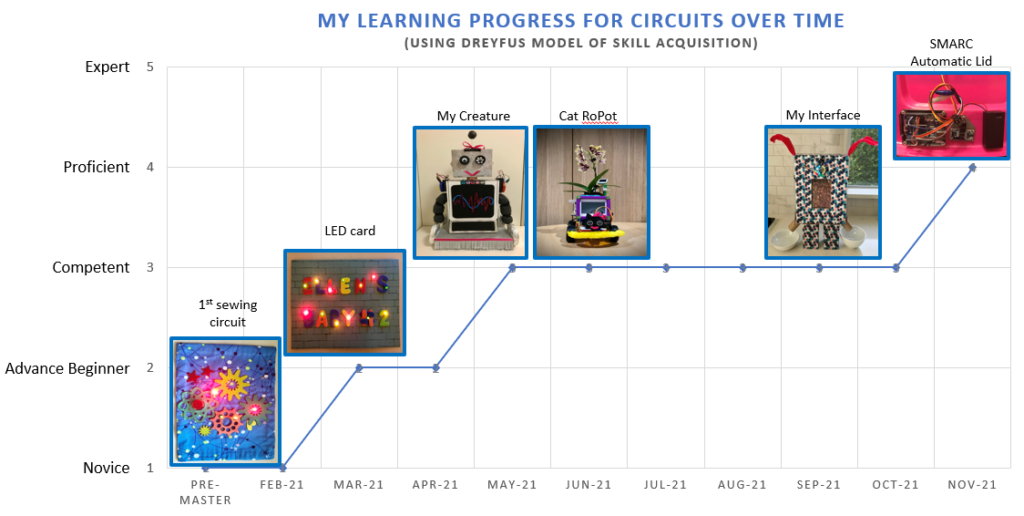
Overall, based on the Dreyfus Model of Skill Acquisition, I would categorise my current understanding of circuits as Competent level, from the Zero to Novice level through many Build fortnightly homework, Build tutorial and skill session and Maker Project. I hope that my proficiency will continue to improve over Semester 2 as I complete more Build fortnightly homework and build a Cyber Physical System for our CPS project group. My desired skill level will be Competent to Proficient and I’m planning to achieve this level by the end of this year through building some electronic toys/robot for my kids and learning from online tutorials. Please see the chart below for an overview of my circuits learning progress.

Below are some examples of my skill development that highlights the successes and failures, lessons learned and turning moments.
Sewing Circuits
The components that I used for this sewing circuit:
- Blue Fabric square with nodes and lines pattern because blue is my favourite colour
- Wooden embroidery hoops
- Conductive thread
- Needle
- Colourful sticker felts for decoration
- 3V coin battery with the sewable battery holder
- Resistors
- Colourful LED lights
The process
- I placed fabric square in the middle of the wooden embroidery hoop and secure it by tightening the screw on the side.
- I started to stitch the conductive thread following the nodes and lines pattern on the fabric to link the battery holder from each corner with the negative to negative side, and the positive to positive side. Each corner will join to a LED and resistor to form a circuit on the decoration felts.
- Starting with the first LED legs (anode/positive/longer leg)) through the fabric and then flatten the legs against the fabric on the other side and using pliers to make small loops in the wires for each LED and also the accompanying resistor to make it easier to sew them onto the fabric.
- Tie off and cut the thread before sewing the other leg to the fabric otherwise the current will flow through the thread and the circuit won’t work to light up the LED. Continue to sew to the cathode (negative/shorter leg) of the LED, tie the cathode to the fabric and tie off and cut the thread.
- Turn on the battery to test your first circuit, the LED should glow bright. If not, see troubleshooting below.
- Repeat for the remaining LEDs and make sure the thread of the other circuits does not touch each other as this will interrupt the current. Always check that the thread is not touching any other conductive material and only join to the legs of the resistor and LED and does not cross with each other.
- Then I put the decoration felts on top of the fabric and realised it’s not a sticker felts, they were iron-on felts, so it was difficult for me to iron the felts around the LEDs without crashing any of them. I learned that I should have positioned the felt decoration on top of this fabric and iron them to hold it before I sew the other components.
During this activity I went through multiple LED lights because I didn’t use resistors initially. I learned that resistors are used to limit the flow of current from the battery so it doesn’t burn out the LED by connecting each arms/legs separately . Once I realised this, on the second iteration I used resistor for the parallel circuit and without resistor on the series circuit. To understand the different between parallel and series circuits, I learned from this link and diagrams as shown below:
https://learn.sparkfun.com/tutorials/series-and-parallel-circuits/all
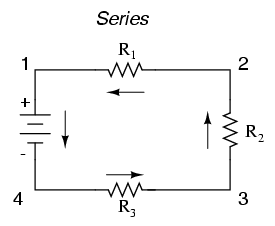

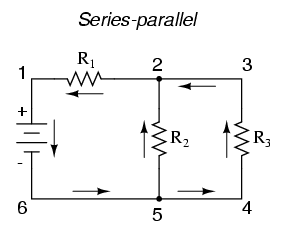
Image Source: https://workforce.libretexts.org/Bookshelves/Electronics_Technology/Book%3A_Electric_Circuits_I_-Direct_Current(Kuphaldt)/05%3A_Series_And_Parallel_Circuits/5.01%3A_What_are_Series_and_Parallel_Circuits
This led me to a new understanding of how resistors work in a circuit to limit the flow of the current, a new skill that I will continue to use and build upon next activities. I was so excited to see the LEDs light up when the circuit finally worked. I found this exercise was challenging trying to construct a circuit for the first time but also exciting at the same time when I also tried to get to know my cohort. I was sitting next to Adrian and he never sew before so I helped him to put the thread on the needle as this was quite tricky. This sewing circuit activity and combined with the Makerspace orientation from Saskia, made me excited to start my Cybernetics journey through hand-on learning by doing approach.
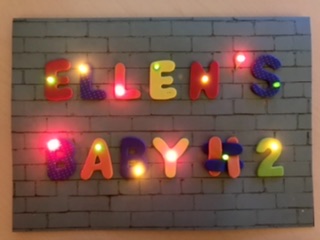
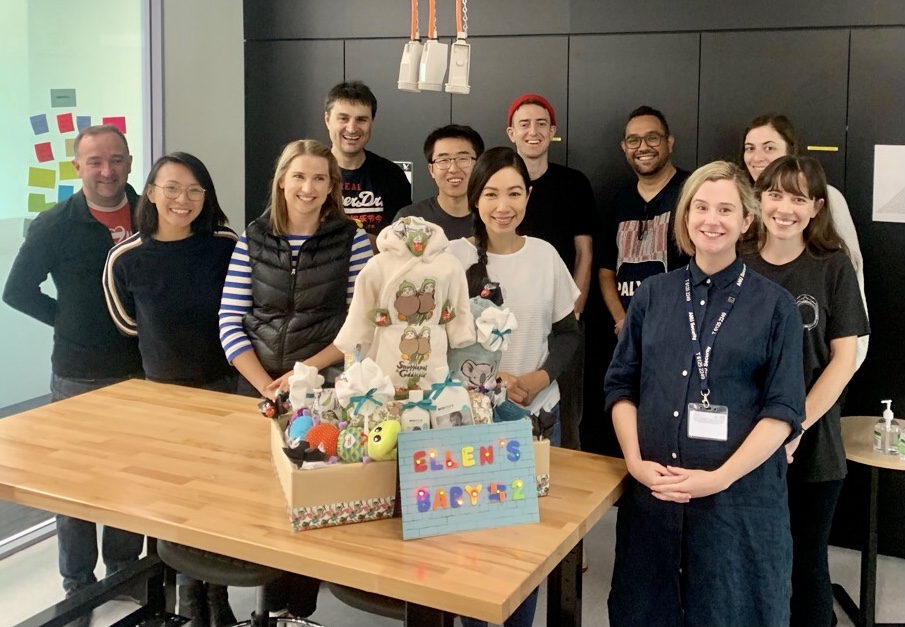
Few weeks later I had my turning points with so much excitement to apply my new sewing circuit skill to make a personalised card LED card for one of the teaching staff, Ellen Broad who’s having her second baby. Our cohort gives a surprise nappy cake to farewell Ellen, with some engineering construction involved in making this nappy cake. Very practical application of what I learned so far through this journey. I also made birthday cards for my husband and son the following month. This new skill definitely take me to the next level of creativity in the future.

More skills developed in circuits are explained on the links below:
My Creature – Sensors, Circuits and Actuators
My Maker Project – Cat RoPot
My Interface – Cereal Dispenser Robot
CPS Project – SMARC
I believe I have progressed from zero skills in circuits to building my maker project which is a cyber-physical system that had multiple sensors, actuators, interfaces and portable power to form a 3 in 1 integrated device. Based on my learning experiments and experiences in Semester 1 and 2, I think I am now sitting at the Proficient level on the Dreyfus Model chart. I hope to continue developing my skills in circuits to become Expert in the future and continue to practice this skill after the Masters program as I really enjoy learning by doing and making things with all circuits.